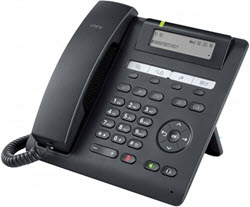
driver
Call Bridge
For use with Windows 7/8 / 8.1 / 10 64-Bit, the software version of the system must be relatively up-to-date to use the CallBridge V2 R3.15.0 : (2000er, 4000er series and F900 = min. V. 2/3000 series and F200-F650 min. V. 7). If your system has an older software version and you are using Windows 7 64-Bit, you can install CallBridge V2 R2.2.0. The constellation is not officially released, but works in 99% cases. For use with Windows 8 / 8.1 / 10 64-Bit you may have to update your system!
Use the CallBridge V2 R2.2.0 only for Windows 7 64-bit systems, if the system does not have a current software version.
| version | date | operating systems | download |
|---|---|---|---|
| V2 R3.15 | 04.10.2019 | Windows XP Windows Vista 32bit Windows Vista 64bit Windows 7 32bit Windows 7 64bit Windows 8 32bit Windows 8 64bit Windows 8.1 32bit Windows 8.1 64bit Windows 10 32bit Windows 10 64bit windows 11 | Download |
| V2 R2.2.0 | 08.10.2010 | Windows 7 64bit | Download |
Informationen
Callbridge version choice
Depending on the firmware version of your PABX, a version adapted to your operating system must be used. Basically, the version to be used can be differentiated based on the system series :
| old firmware 2000 series <2 3000 series / F200-F650 F900 new firmware |
2000 series> = 2 3000 series / F200-F650> = V7 4000 series / F900> = V2 | |
| Windows XP up to 10 32-bit | CallBridge V2 R3.15 | CallBridge V2 R3.15 |
| Windows 7 64-bit | CallBridge V2 R2.2.0 | CallBridge V2 R3.15 |
| Windows 8 and 10 64-bit | not possible | CallBridge V2 R3.15 |
connection diagram
We generally recommend connecting the phone directly to the PC. The following diagrams show the connections schematically: The PABX (eg HiPath) is the gateway to the public telephone network. The phones are also connected to the PC via V.24 (serial COMPort), USB or LAN. Communication between the phone and PC takes place via the CallBridge TA, TU or IP. Setup automatically selects which version of the CallBridge is required during installation. The CallBridge then provides the system with the TAPI (Telephony Application Programming Interface), with which TAPICall can then control the phone and evaluate information about the caller, such as reverse search, answering a call, starting a call, ending a call, timing, speed dialing and more.
Connection diagram Callbridge IP:
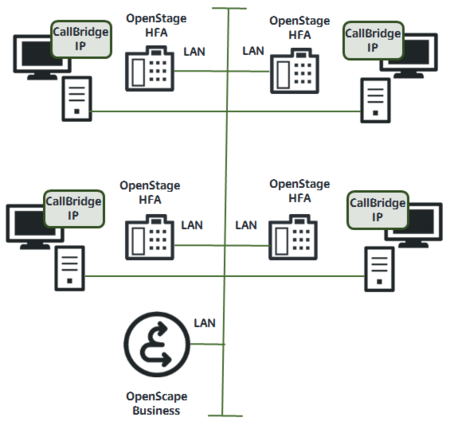
This example shows the connection of an OpenScape Business telephone system with OpenStage HFA telephones via Lan.
Callbridge TA connection diagram:
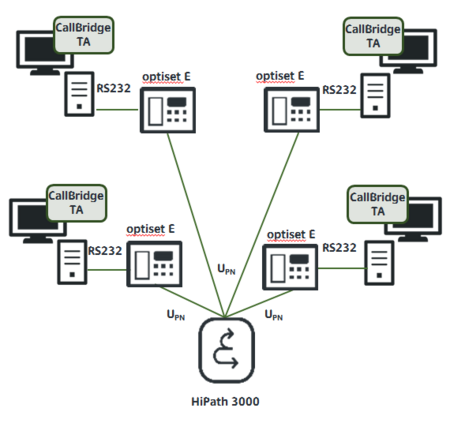
This example shows the connection of a HiPath 3000 telephone system via UPN with optiset telephones that are connected to the PCs via RS232.
Connection diagram Callbridge TU:
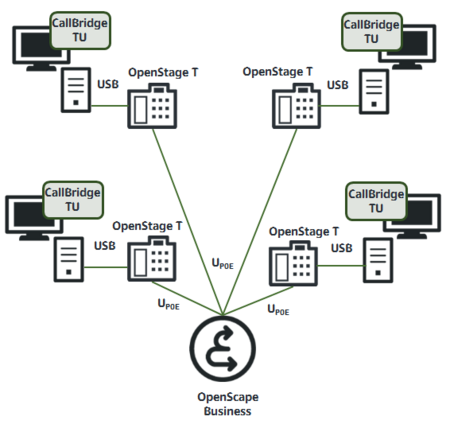
This example shows the connection of an OpenScape Business telephone system via UPN with OpenStage T phones that are connected to the PCs via USB.
compatibility matrix
The following table shows a list of all supported end devices.
PC software setup
Begin:- Download the appropriate CallBridge Collection.
- Unzip the .ZIP file with all files and folders into any folder.
The files must be completely unpacked, because only then can the setup start properly!
- A distinction must now be made between an OpenStage 60 (T) / 80 (T) and all other system telephones. Check (on the back of the phone) what kind of phone you have.
- If OpenStage 60 (T) / 80 (T): Change to the folder "USB_OpenStage_60_80T" and execute "Setup_RNDIS_V3_R0.1.0.exe".
All other phones: Change to the folder "USB_OpenStage_30_40T_optiPoint_500_600" (with V2 R2.2.0: "USB_Windows_XP_Vista_7_2003_2008") and execute "Setup_USB_V3_R0.1.0.exe" (or "USB_V2_R1.2.0_Setup.exe") - Connect your phone to the PC.
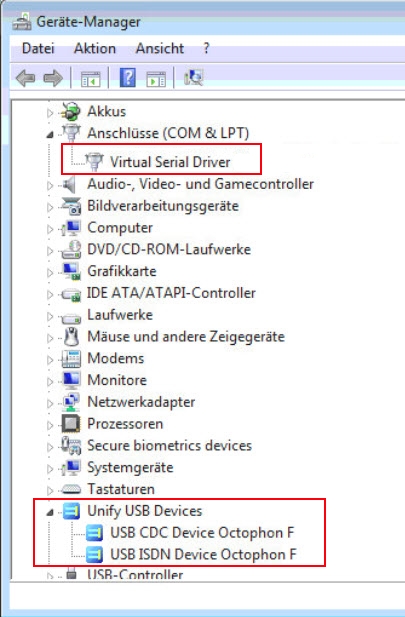
- A separate Siemens Unify tree with two devices and a virtual COMPort now appear in the device manager:
- The "Setup_CBC_V2_RX.X.0.exe" is located in the root directory of the extracted .ZIP archive. Please do this. The CBC32.msi or CBC64.msi are not to be executed, since the setup calls this data itself.
- Click "Next" until you get a selection:
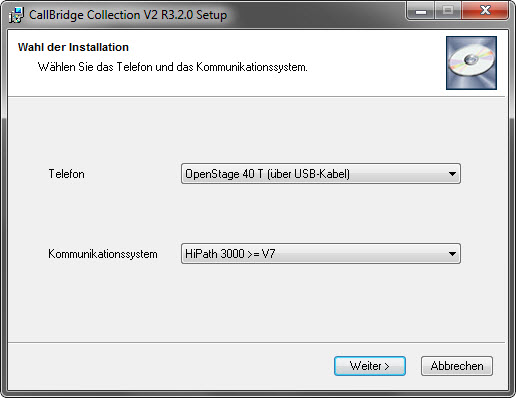
- Select your phone and your system with the corresponding firmware version.
- Click "Next" until the call bridge is installed.
- Now run TAPICall-10002.msi to install TAPICall.
- You now have the following entries under "Programs and functions" or "Programs and features":

- After starting TAPICall for the first time, the settings open. In the menu item "TAPI driver selection" please select Callbridge. Click on "Finish" and let the TAPI wizard run.
- If you have any questions, please call +49 (6422) 89800-50.
You need an active connection between the workstation PC and the telephone. With CallBridge TA and CallBridge TU direct connection, with CallBridge IP via the LAN.
You can use a special USB cable purchase our online shop.
Set up the TAPI connection
Note: Under Windows XP you should log in as the user for whom the TAPI connection is to be set up.
1. Select the entry "Telephone and Modem" in the start menu. Double-click the symbol on ( under Windows XP the symbol "Telephone- and modem options" ).
2. Switch to the "Advanced Options" tab.
3. Select the entry "CorNet-TS TAPI Service Provider 1" from the list of installed drivers. Click on "Configure".
4. In the following dialog window click twice on "Next", then the phone will be searched for automatically.
5. The next steps consist of configuring the TAPI driver or the telephone. In the following window, please set all data according to your phone.
Note : When configuring the CallBridge IP, please fill in at least three of the four input fields. Example: number + IP-address + User-password.
USB installation with error code 0x2
If this error message (code 0x2) appears, you can install the USB driver ("Unify USB CDC Device ..." and "Unify USB ISDN Device ...") via the device manager if it is displayed as an unknown device. These files are required for this: USB driver for device manager installation
The "Virtual Serial Driver (COMx)" device is installed by the USB setup and cannot be installed manually.
More information
Under callbridge.de you will receive further information.
Manuals, documentation and additional downloads
Currently no additional downloads available.
TAPICall
- Install the TAPI driver and if necessary configure it in the "Control Panel" under "Phone and Modem" in the "Advanced" area.
- Download TAPICall and run the installation file. The installation file is also located in the above TAPI driver download (filename TAPICall-10002.msi)
- Select the installed driver in TAPICall.
- Work effectively and quickly. Here is an introductory video to the main features of TAPICall.
Hints
Start the setup file of the TAPI driver you downloaded and follow the user guide. After completing the installation, it may be necessary to restart the computer. Some download files contain several TAPI drivers. Please pay attention to the selection of the driver suitable for your device. If the connection is made via USB, first install the USB driver of the device and then the TAPI driver.
We assume no liability for the completeness, function, scope or compatibility of the drivers provided above for download. Source and originator unless otherwise stated is the manufacturer of the hardware / device. TAPICall is our product, which is included in the download. If you have any questions about the drivers in connection with TAPICall, call: +49 (6422) 89800-50
